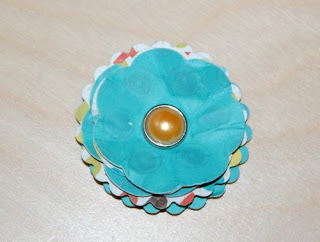
For this I used my Cuttlebug machine and some Spellbinder cutting plates. I used the smallest ones of two different sets but you can use any machine and die cut that you want. I cut out several of each one using two sided paper.

Then I arranged them flipping every other one to show the other side of the paper.

I stacked them and then punched a hole in the middle.

Then add a brad of your choice.

Then starting with the top one I squeeze and fold in each layer -separately so that they fold in different.

Then done! Just add to your card or page.

**Make-Your-Own Embellishments Blog Extravaganza**
The Designed2Delight Lead Designers have been busy!!
Follow all the links below to view 9 different tutorials for 9 different embellishments (on 8 diifferent blogs) that YOU can make YOURSELF!!
Follow all the links below to view 9 different tutorials for 9 different embellishments (on 8 diifferent blogs) that YOU can make YOURSELF!!
 |
| Designed2Delight.com |
Don't forget to stop by the Designed2Delight Digital Stamps group on Crafter's Digital Art Center for the details AND a FREE Digital Stamp!!
 |
| Jane ~ Make Your Own Buttons Tutorial |
 |
| Lola ~ Make Your Own Felt and Fabric Flowers Tutorial |
 |
| Faith ~ Make Your Own Faux Prima Flowers Tutorial |
 |
| Kathy ~ Make Your Own Chipboard Accents Tutorial |
 |
| Debbie ~ Scalloped Punched Paper Flower Tutorial |
 |
| Robin ~ Stitching with Beads Tutorial |
 |
| Michelle ~ Scallop Punched Flower/Medallion Tutorial |
 |
| Michelle ~ Ribbon Frame Tutorial |
 |
| Sherrie ~ Make Your Own Ribbon Roses Tutorial |
Thanks for stopping by!


very cute!! Fun Fluffy Flower!! :)
ReplyDeleteSo Pretty! Thanks for the tutorial! I can't wait to give them a try! Fun colors you've used too!
ReplyDeleteHugs,
Lisa
This is great, Debbie! So easy and cute!
ReplyDeleteHi Debbie! LOVE your card and fun flower embellishment!! THanks so much for sharing your tutorial with us. Can't wait to start making some of my own embellishments! *Ü*
ReplyDeleteSuper cool card and thanks for the tutorial!!!
ReplyDeleteFun tutorial Debbie, love the crinkly flower. Your card is so pretty, too.
ReplyDeleteFabulous idea! Thanks for the inspiration!
ReplyDeleteYea!! This is done with dies I have!! I don't have a "normal" scalloped punch, but didn't think to use my Nesties. :) Awesome tutorial; thank you!! LOVE your card, too!
ReplyDeleteGreat use of the spell binders Debbie, love it!!
ReplyDeleteSensational! You know, looking through your blog again tonight a few words came to mind..PROLIFIC, INCREDIBLE, AMAZING... I really enjoy your work - VERY INSPIRATIONAL!
ReplyDeleteYour flower is so cool! Even before you crumpled it, it looked neat.
ReplyDeleteGreat tutorial. Thank you for sharing it.
ReplyDelete